|
Stereo
Recording Recordists working with classical and acoustic music must be able to consistently deliver accurate recordings regardless of the acoustics of the venue, size and composition of the ensemble, and stage layout. This section will discuss the basics for creating consistent high quality stereo recordings, and how to adapt to varying circumstances. This discussion will focus on only dual microphone techniques, and will not get into 3, 4, and 5 mic arrays such as systems used by Decca, Mercury, BBC, etc. I will also focus only on cardiod and omni polar patterns, as these are going to be the most commonly used and will fit most situations. All of the other polar patterns (including - hypocardiod/wide cardiod, super cardiod, hypercardiod, figure 8) have a place in stereophonic recording, but will be most often used to overcome issues of frequency balance, acoustics, or other special situations, and since this is a basic overview these issues will not be addressed. To begin the discussion of stereo recording, we first need to define our goal; do we want to try to create the impression of an accurate reproduction of the actual performance, do we want to make it sound more focused, or wider and more open? And to this question there is no correct answer, and often the answer may be different for each event, but with an understanding of basic stereo recording techniques each recording can be tailored for the desired result. My
general approach to stereo recording is to create the impression
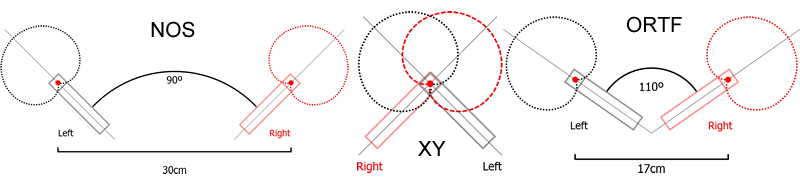
of the actual event as accurately as possible. So what is the best way to go about painting this picture? If you have some experience with stereo recording your first thought might go toward established stereo micing techniques, the most common being AB, XY, NOS, DIN, and ORTF. Each of these systems refers to a specific angle and distance between the microphones. For example in NOS the microphones are placed so the capsules are 90° from each other (the mics will form a right angle) with 30cm between the capsules, ORTF is 110° between the mics and 17cm between the capsules. When reading about these mic techniques they are often accompanied by a general description of how they will sound such as spacious, tightly focused, accurate and open, etc., which may lead to the conclusion that to choose the correct stereo micing system, one must simply pick the system that 'sounds best' to them, and then place it in front of the ensemble. What most discussions of stereo techniques leave out is that each of these systems is meant for a specific set of circumstances, and will not yield consistent results for every application.
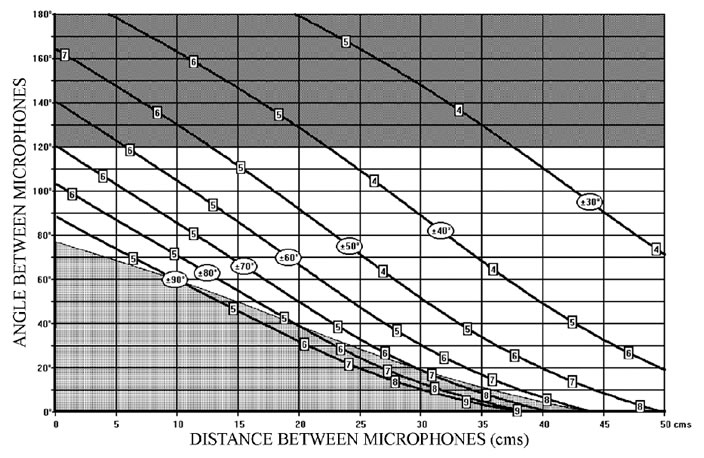
How do we determine the correct micing system for each circumstance? Rather than trial and error with these established systems, BBC and freelance audio engineer Michael Williams has proposed a different solution, where each situation is evaluated and the micing system is tailored for optimum results. This variable dual micing system is how I approach stereo micing. Though his system has a great deal of complexity to it, its basic components are straightforward and easy to implement. This approach can also be used if you prefer an established system, as it will help you determine which system most closely fits your recording situation. The most important aspect of the variable system is the recording angle. This is not the angle between the microphones, but rather the angle that encompasses what you wish to record from the perspective of the microphones. This can easily be established by standing at the microphone position and using a protractor (there are many fine free apps for iPhone that work great for this) and measuring the angle from the mic stand to the outside boundaries of what you wish to record. If using two spaced microphones, like a pair of omnis, stand between the two stands for this measurement. The recording angle is not a hard boundary for what the microphones will pick up, but rather defines the area that will be accurately represented in the stereo image. Sound sources outside of the recording angle will be compressed and represented entirely on either the left or right speaker. Sources that are too far outside the recording angle can also cause phase issues, so it is important to be sure all the relevant sound sources are included within the recording angle. For the most accurate results it is recommended to slightly overestimate the recording angle and leave extra room on the sides; I often try to not use more than 75-80% of the recording angle to minimize localization distortion near the outer extremes of the recording angle. Once we have established our recording angle, Williams provides us with charts for each polar pattern to determine the optimum configuration for the microphones; the chart below is for cardiod microphones. On this chart the microphone angles are along the left on the Y axis while the distance between the mics is on the bottom on the X axis. Recording angles are shown in ovals as a plus or minus from a central axis, so a 100° recording angle will be shown as ±50° on the chart. The square blocks represent Standard Deviation, or the maximum angular distortion for each combination of angle and distance. This represents how sources will be localized within the stereo image. If we are using a combination of angle and distance that intersects block 5 for example, this means elements in the stereo image can be skewed up to 5° from their actual position in the recording angle. The shaded areas at the top and bottom represent reverberation limits, where the inclusion of reverberation is considered to have crossed the threshold of what would commonly be deemed acceptable.
While this may seem somewhat complicated, in practice it is relatively straightforward. If we need a recording angle of 100°, we look to the chart for the ±50° oval, then next look to where it intersects the lowest angular distortion, represented by the numbers in the boxes, outside of the shaded areas. We can see on the chart that one such intersection with box 4 is very close to a mic angle or 70° and a distance between mics of 25cm. This will be the optimum setup for achieving an accurate stereo recording with minimal angular distortion. This may give us the most accurate recording in terms of localization within the stereo field, but there are also other ways to utilize the chart. Mic angle and distance use two different methods for creating stereo sound,the variation of angle creates and intensity difference, while the variation of distance creates a timing difference. Both intensity and timing differential have a slightly different sound to them, so if you prefer one to the other, the chart can be used to make combinations what yield the desired recording angle. So if we want a greater time differential, which may yield a sound that is more open, we can look again at our 100° recording angle and see that we could place the mics at 50cm apart with 0° mic angle (both mics straight forward). While this position will maximize the effect of the time differential, it will also create high angular distortion of 8° so sources within the stereo field may sound fairly skewed. We can now use this chart to examine our established stereo micing systems to better understand why they sound the way the do, and how to best utilize them. One of the most common stereo techniques that is often built into stereo microphones is XY, where the angle between the mics is 90° with no distance between the mics (capsules often placed one on top of the other). Using this technique, especially with smaller ensembles, often creates a sound the is tight and small and focused just in the center of the stereo image. Looking at our chart we can see that this setup yields a huge recording angle of nearly 180°. With a small ensemble this leaves most of the available recording angle empty, hence the impression the source is localized only in the very center of the image. Conversely, this setup could be seen as very safe for large ensemble recordings, as it could be placed at the front of the stage and easily encompass all the performers within the recording angle. Another common technique is to use two omni mics placed far apart (omni chart not pictured). When omnis are placed more than a few feet apart they do not create a coherent recording angle, and angular distortion is very high. This lack of a coherent recording angle can result in a bowed or even absent phantom image, creating the perception of a hole in the middle of the stereo image. In this setup elements on the left will be produced mostly on the left speaker, and vise versa, creating an exaggerated wider stereo image. This is not necessarily a bad thing, as this is a technique I use as it often results in flattering recordings that sound good in themselves. But it is important to keep the limitations and compromises of each stereo setup in mind in order to be confident in creating desired results. What type of microphone should I use? Almost any type of microphone can be used for distance stereo recording, as long as we are aware of their limitations. The most common mic type is a small diaphragm cardiod condenser. Small diaphragm mics have better off axis coloration that most other mic types, meaning that the sounds to the sides of the mic are less altered. They have excellent transient response and can cleanly capture all the textural and dynamic subtitles of a complex source. They are also smaller and lighter, so are easier to manage in a stereo configuration. Large diaphragm condenser mics are popular on choirs and have great body and tone. Ribbon mics can be used to great effect with a warm and natural sound, especially with chamber groups, but are very sensitive to the acoustics of a space. I use stereo ribbons for some ensemble types, but have found that they are not well suited to many distance stereo tasks unless conditions are just right. Dynamic mics can be used as well, and I have even seen SM57s used in a distant stereo setup with surprisingly good results. Many dynamic mics are tailored for close micing and dealing with proximity effects, so will need to be treated with EQ when used for distant micing. If you have two matching mics sitting around, try them out, they may work well for producing a reference recording, and a mic should not necessarily be excluded just because it is not the optimum choice. Steps to put these techniques into practice: First - locate the position for the mic stand(s). To do this we want to listen for the balance of direct to reverberant sound. Ideally the mics should be placed where there is a greater balance of direct sound to maximize clarity in the recording. If you want a 'wetter' recording, find the place nearest the point where the direct sound is overtaken by reverberant sound, and place the mics where there is slightly more direct sound. In general you will be placing the mics fairly close to the stage, if not on it. For omni mics, the mics should generally not be placed more than a few feet from of the performers, as the sound will get washed out very quickly the further back they are placed. A question I am often asked is: "if the best sound in the hall is in the center or closer to the back, why don't you put the mics there?" When you sit in your favorite spot, you also have your brain interpreting the sounds for you. If there is a soft solo for instance, you can look at the soloist and your brain will focus your attention on locating the sound source and be sure it is brought to the front of your awareness. Even if the sound is very wet from where you are sitting, you brain will help you interpret the sounds so you hear the music with clarity. A mic obviously has no brain so cannot interpret the sounds it receives, it just picks up everything within its capability, so we need to place them where they 'hear' the best sound and balance. And this goes back to: we cannot completely recreate the concert experience, and are creating the best possible representation. Once we have found a location that will give us our desired sound we must determine our recording angle and stereo mic setup, as discussed above. Next we have to determine how high to place the mics. The easiest way to approach this is to listen for balance. If the mics are too low performers in the front row may be too prominently represented and individuals may stick out, too high and too much reverberation can creep in and make the sound muddy. Start on the lower side, and slowly move the mic up until you are hearing an even balance from front to back and individuals are not sticking out of the texture. In general a 15ft stand is recommended for distance stereo recording, as a standard stage stand will not be tall enough. Mics can also be suspended from the ceiling or catwalk, which offers a cleaner look with less audience sight line issues. If using widely spaced omnis, a starting point is to place the mics where they divide the ensemble into thirds, and follow the same procedure for determining height. The mics should be placed as close as possible to the source, where individuals are not sticking out. If moving the mics further apart listen as the center will start to bow and then create a hole the further apart they are positioned. I
hope this overview has been informative and will help you make
the most out of your stereo recordings. While there are many steps
in this process of determining optimal stereo placement for a
horizontal plane, it is just scratching the surface of stereophonic
recording. Many more calculations, such as the inclusion and localization
of early reflections and reverberant field both within and outside
of the recording angle, the effect of elevation above the recording
plane on angular distortion, and optimizing for mono compatibility
can also be considered.
Sources for further reading: Williams, Michael. "The Stereophonic Zoom:
A Practical Approach to Determining the Characteristics of a Spaced
Pair of Microphones " Williams, Michael. "Unified Theory of Microphone
Systems for Stereophonic Sound Recording" Williams, Michael. "Early Reflections and Reverberant
Field Distribution in Dual Microphone Stereophonic Sound Recording
Systems" Preston, Colin . "An Analysis of Frequency
Dependent Hybrid Microphone Arrays for Stereophonic Sound Recording" Simonsen, Gert."Master's Thesis at the Technical University of Denmark, Lyngby (1984)"
|